OAuth 2.0 액세스 토큰 가져오기
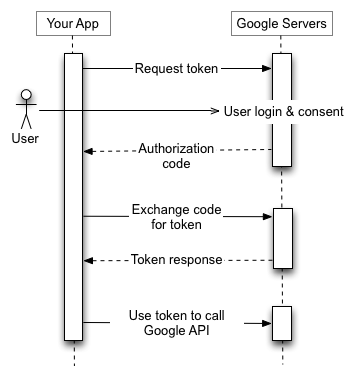
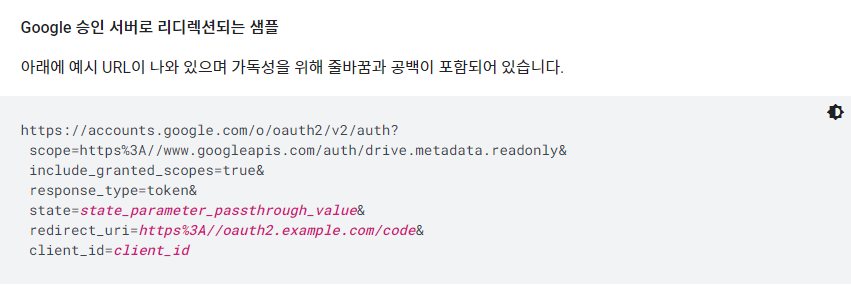
https://accounts.google.com/o/oauth2/v2/auth에서 Google의 OAuth 2.0 엔드포인트에 대한 액세스를 요청하는 URL을 생성합니다. 이 엔드포인트는 HTTPS를 통해 액세스할 수 있으며 일반 HTTP 연결은 거부됩니다.
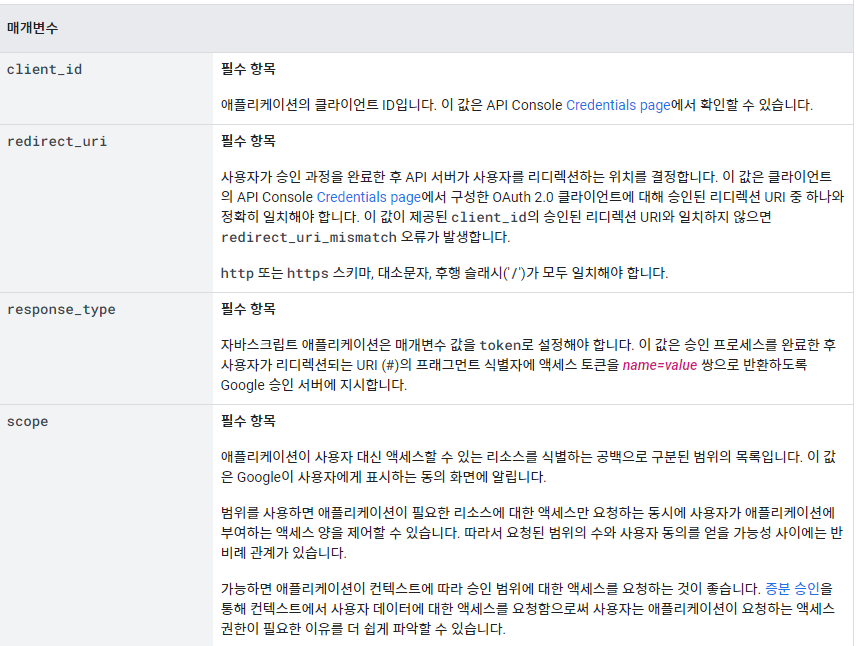
Google 승인 서버는 웹 서버 애플리케이션에 다음과 같은 쿼리 문자열 매개변수를 지원합니다.


토큰을 받고 토큰을 백으로 보내는 방식을 사용했기때문에 토큰을 받아오는 방식은 js코드를 이용했는데

코드보기
function oauthSignIn() {
  // Google's OAuth 2.0 endpoint for requesting an access token
  var oauth2Endpoint = 'https://accounts.google.com/o/oauth2/v2/auth';

  // Create <form> element to submit parameters to OAuth 2.0 endpoint.
  var form = document.createElement('form');
  form.setAttribute('method', 'GET'); // Send as a GET request.
  form.setAttribute('action', oauth2Endpoint);

  // Parameters to pass to OAuth 2.0 endpoint.
  var params = {'client_id': 'YOUR_CLIENT_ID',
                'redirect_uri': 'YOUR_REDIRECT_URI',
                'response_type': 'token',
                'scope': 'https://www.googleapis.com/auth/drive.metadata.readonly',
                'include_granted_scopes': 'true',
                'state': 'pass-through value'};

  // Add form parameters as hidden input values.
  for (var p in params) {
    var input = document.createElement('input');
    input.setAttribute('type', 'hidden');
    input.setAttribute('name', p);
    input.setAttribute('value', params[p]);
    form.appendChild(input);
  }

  // Add form to page and submit it to open the OAuth 2.0 endpoint.
  document.body.appendChild(form);
  form.submit();
}
해당 스니펫을 보고 했습니다
그 후 발급된 access_token을 백엔드서버로 보내고나서 장고 어플리케이션내에서 유저의 데이터를 가져오기위해
async function getGoogleProfile() {
    const access_token = new URLSearchParams(location.href).get('access_token')
    const response = await fetch('http://127.0.0.1:8000/api/user/google/',{
        headers: {
            'content-type': 'application/json'
        },
        method: 'POST',
        body: JSON.stringify({
            'access_token':access_token
    }),
})
이코드를 활용해서 백엔드로 token값만 넘기게 하였고 그다음부터는 django의 api/user/google에 연결이 되어있는 view에서 엑세스 토큰을 활용을 하게됩니다

def post(self, request):
	access_token = request.data['access_token']
	headers = {'Authorization': f'Bearer {access_token}'}
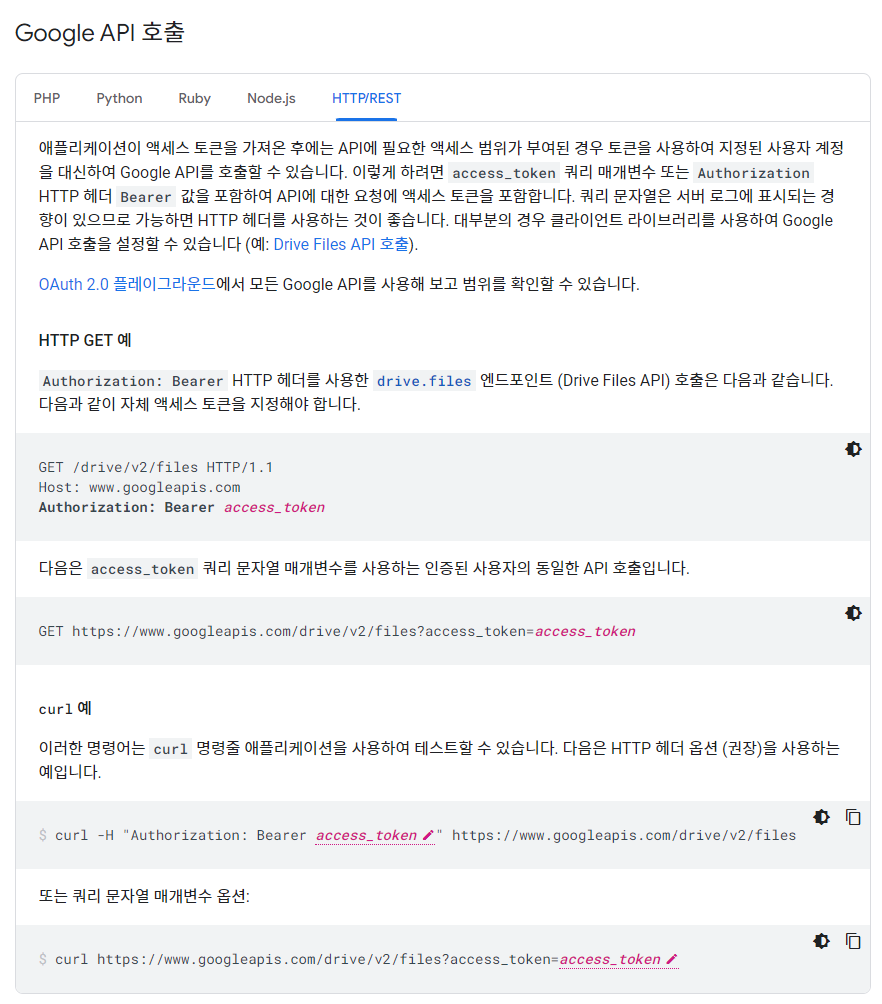
	user_data = requests.get('https://www.googleapis.com/oauth2/v2/userinfo', headers=headers)
사진에서는 drive를 가져오는거라 링크가 저렇지만 유저의 정보를 가져오려면 다른 api를 이용해야한다
그리고 받아온user_data를 출력하게되면

이런식으로 찍히게된다 이제 이 코드를 이용해서 유저db에 저장을 하던 아니면 어떻게 하던 원하는대로 저장을 하는 방법을 이용해주면된다
'내일배움 캠프 > TIL' 카테고리의 다른 글
| Django 테스트 코드 작성하기 (1) | 2023.05.24 |
|---|---|
| 2023 05 23 선발대 숙제 (0) | 2023.05.23 |
| 코딩테스트 연습성격 유형 검사하기 (2) | 2023.05.18 |
| 2023 05 18 이미지 특정부분만 화풍 바꾸기 (0) | 2023.05.18 |
| 2023 05 16 javascript export import (0) | 2023.05.18 |


댓글